MechanicalSample for working with assemblies

Assembly-Sample
Insert components from the content center with one click. Assemble components with just a few clicks.
Insert components and swap with existing components. Make sketches or working planes visible by clicking on a component. Quick cuts in the 3 main levels and much more.
Favoriten Dialog
MechanicalSample offers the possibility to efficiently display bolts or nuts from the Content Center as favorites in a dialog and to insert them into IAM’s with a 2-click method completely, with the required size and length, automated.

Scannen Favoriten CCParts
Hierzu werden in einer IAM vorzüglich Schrauben, Muttern und Unterlagsscheiben, in einer belibigen Größe und einer beliebigen Kategorie platziert und anschließend in das Favoriten-Tool eingescannt. Es genügt wenn nur ein Bauteil gescannt wird um dann alle Baugrößen verfügbar zu machen. Die Bauteile werden direkt aus dem Inhaltscenter eingefügt.
For this purpose, screws, nuts and washers of any size and category are placed in an IAM and then scanned into the Favorites tool. It is sufficient if only one component is scanned to make all sizes available. The parts are inserted directly from the content center.
À cette fin, des vis, des écrous et des rondelles de toutes tailles et catégories sont placés dans un IAM puis scannés dans l’outil Favoris. Il suffit qu’un seul composant soit numérisé pour que toutes les tailles soient disponibles. Les pièces sont insérées directement à partir du centre de contenu.urs
A questo scopo, viti, dadi e rondelle di qualsiasi dimensione e categoria vengono inseriti in un IAM e poi scansionati nello strumento Preferiti. È sufficiente scansionare un solo componente per rendere disponibili tutte le dimensioni. I componenti vengono inseriti direttamente dal centro contenuti.


Anwendungsbeispiel
Durch die Auswahl der Kreiskante einer Schraubenbohrung wird ein Schnitt durch die betroffenen Bauteile gelegt und die Schraubengröße bestimmt.
By selecting the circular edge of a bolt hole, a cut is made through the affected components and the bolt size is determined.
En sélectionnant l’arête circulaire d’un trou de vis, une coupe est réalisée à travers les composants concernés et la taille de la vis est déterminée.
Selezionando il bordo circolare del foro di un bullone, si esegue un taglio attraverso i componenti interessati e si determina la dimensione del bullone.

Durch die Auswahl des Gewindeanfangs wird die Schraubenlänge bestimmt.
The screw length is determined by the selection of the thread start.
Le choix du début du filetage permet de déterminer la longueur de la vis.
La lunghezza della vite è determinata dalla scelta dell’inizio della filettatura.

Anschließend werden die Schrauben automatisch eingefügt. Mit dem Befehl: “Größe ändern” öffnet sich der Inventor® Dialog und das Ergebnis kann, falls erforderlich, nachbearbeitet werden.
The screws are then inserted automatically. With the command: “Change size” the Inventor® dialog opens and the result can be reworked if necessary.
Les vis sont ensuite insérées automatiquement. Avec la commande : “Modifier la taille”, la boîte de dialogue Inventor® s’ouvre et le résultat peut être retravaillé si nécessaire.
Le viti vengono quindi inserite automaticamente. Con il comando: “Cambia dimensione” si apre la finestra di dialogo di Inventor® e il risultato può essere rielaborato se necessario.


Anwendungsbeispiel
Schraubenbohrung wählen. Gewindeanfang wählen. Schrauben werden Eingefügt. Aktion abschließen.
Select screw hole. Select the start of the thread. Screws are inserted. Complete the action.
Sélectionner le trou de vis. Sélectionner le début du filetage. Les vis sont insérées. Terminer l’action.
Selezionare il foro della vite. Selezionare l’inizio del filo. Le viti sono inserite. Completare l’azione.


Anordnungen
Es wird immer die Primäre Anordnung gefüllt. Bei Auswahl einer Sekundären Anordnung wird die Primäre Anordnung gefüllt.
The primary arrangement is always filled. If a secondary arrangement is selected, the primary arrangement is filled.
La disposition primaire est toujours remplie. Si une disposition secondaire est sélectionnée, la disposition primaire est remplie.
La disposizione primaria è sempre piena. Se si seleziona una disposizione secondaria, la disposizione primaria viene riempita.


Multi-Insert
With this button, single IPT’s, several assembled IPT’s, or inserted IAM’s consisting of several IPT’s can be assembled in hole arrangements or in the same holes with 2 clicks.


Cut on Edge
With “cut on Edge” cuts can be created along any hole. Simply select circular edge and the cut will be created.


Assembly
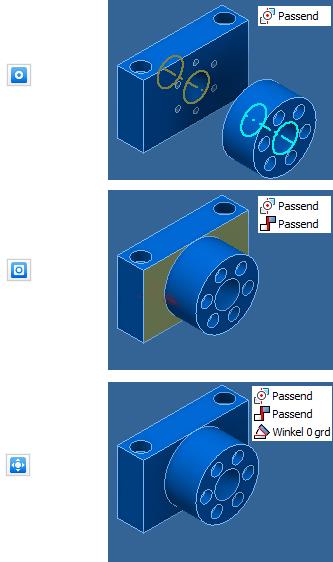
With these 3 buttons it is possible to create axis dependency, surface dependency and angle dependency in a single step! The prerequisites are holes with which the components are to be connected to one another. This is true in 90% of cases. By selecting edges instead of surfaces, it is not necessary to turn the components into a different position!


Assembly levels
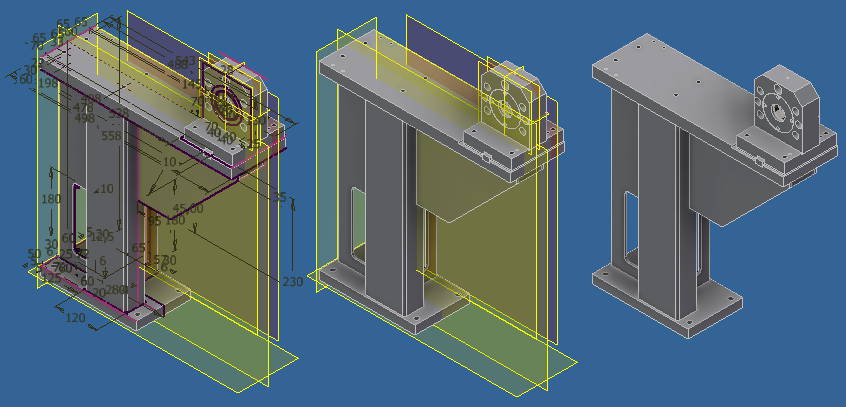
Layers and sketches of components can be switched off step by step in assemblies by multiple clicks.1.click sketches off. 2.click all working planes off. 3.click on original planes.
